Note: in Standard version you can configure one connection for each server type (GeoServer, MapServer, GeoNetwork).
In Premium version you can configure multiple catalog servers and map servers. Using the Advanced publishing option panel in Publish layers form you can select a specific server to publish the data.
Metadata servers should be at least based on GeoNetwork Opensource v2.4 or
higher, or CSW-transactional enabled servers.
Map servers should be at least based on GeoServer v2.0.2 or higher or MapServer 5.6.0 or higher.
However, we recommend to use the latest stable release for each of the above mentioned products.
GeoNetwork Configuration
Configure catalog servers based on GeoNetwork Opensource v2.4
or higher or any CSW-transactional compliant server to publish the metadata from ArcGIS Desktop®.
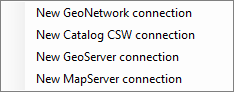
Click New  and select New GeoNetwork connection or New Catalog CSW connection
option.
and select New GeoNetwork connection or New Catalog CSW connection
option.
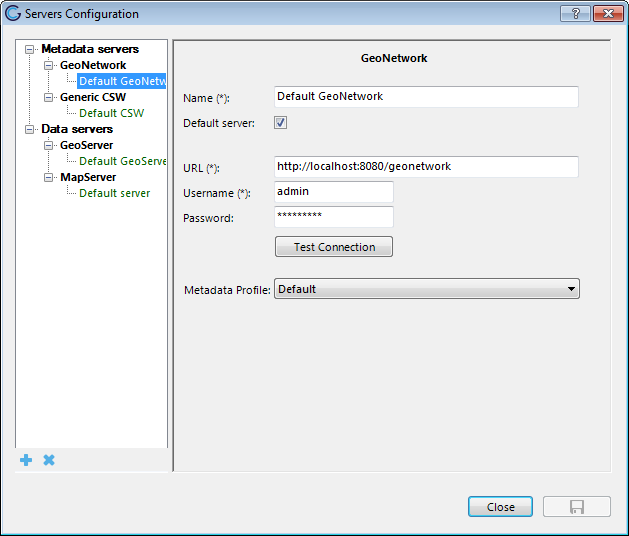
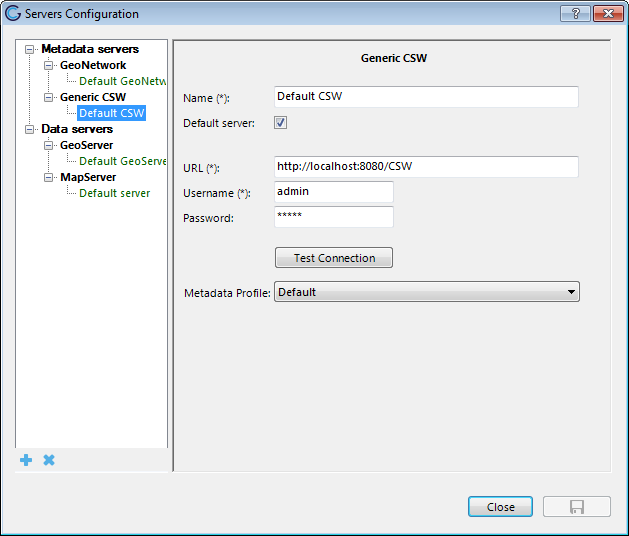
Fill the form fields:
- Name: Choose a user-friendly name for the server
- Url: Url of the catalog server
- Username / password: In case you want to publish to server
that require authorized access.
- Default server: check this if you want to use this server
as the default server to publish metadata
- Metadata profile: choose the metadata profile. The supported metadata profiles are:
- ISO19139 (Default)
- INSPIRE
- Dutch Geography v1.2
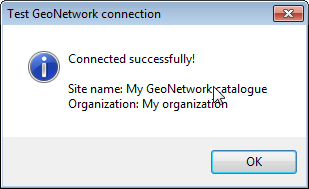
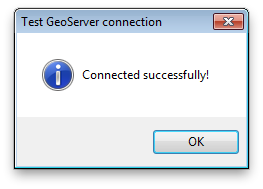
Click Test button to test the
connection to the configured server:
- _
- Test the server connection
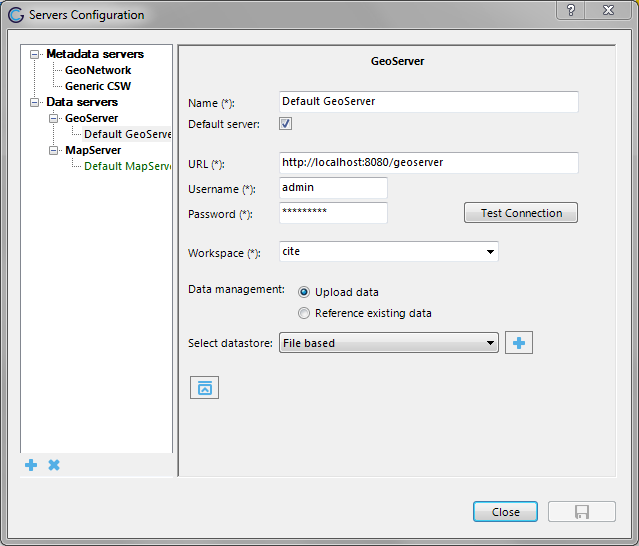
GeoServer configuration
Configure map servers based on GeoServer or MapServer to publish the map data from ArcGIS Desktop®.
Click New and select New GeoServer connection
option.
Fill the form fields:
- Name: User-friendly name for the server
- Url: Url of the Web Map server
- Version: the version of the GeoServer server
- Username / password: In case you want to publish to a
server that require authorized access.
- Workspace: workspace name in GeoServer to store the map
data.
- Default: check this if you want to use this server as the
default server to publish map data.
- Data management:
- Upload data: Choose this option if you want to either:
- Publish your data in file based formats in GeoServer, this means:
- By default Bridge publishes vector data as Shapefiles datastore and raster data as GeoTIFF/World image datastore
- When GeoServer has the GeoPackage extension installed Bridge will publish the vector data as GeoPackage datastore. Raster handling will stay the same
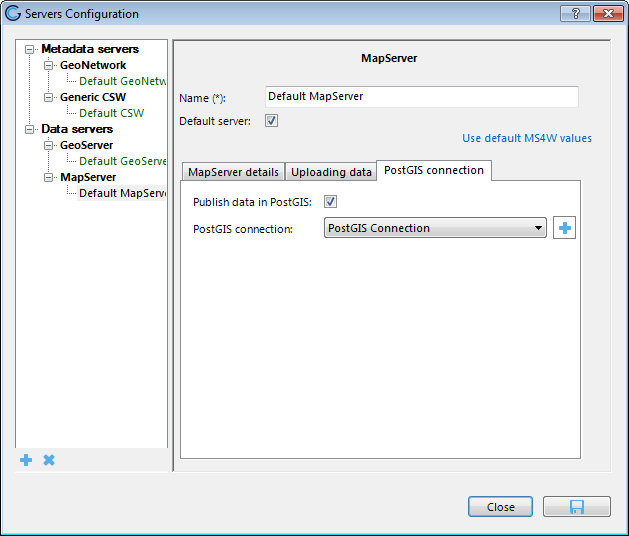
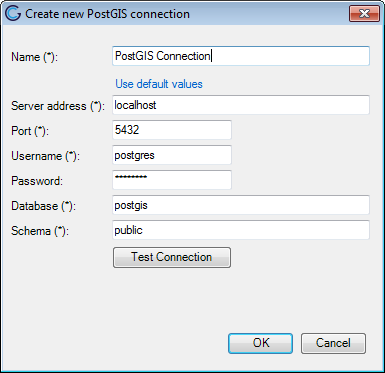
- Publish your data in a PostGIS datastore in GeoServer
- Reference existing data: Choose this option if you want to publish data from either:
- An ArcSDE enabled geodatabase as an ArcSDE datastore in GeoServer.
- An Oracle Spatial geodatabase as an Oracle spatial datastore in GeoServer.
The Test button allows to test the connection to the configured server:
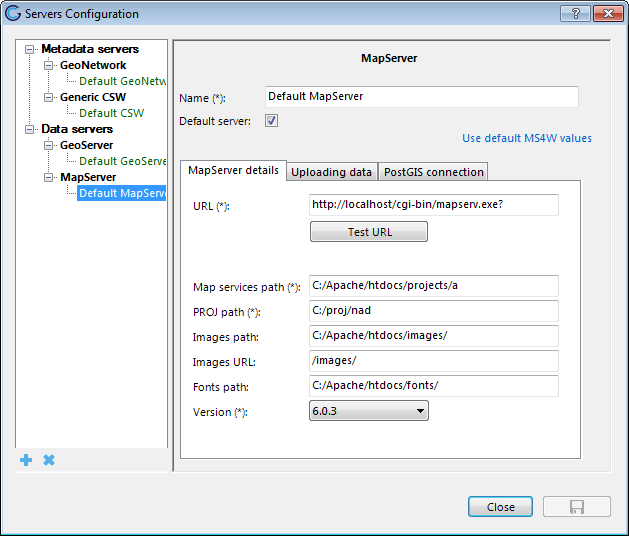
MapServer configuration
Click New and select New MapServer connection option.
Copy fonts to MapServer
Bridge can be configured to copy the fonts used in your symbology to MapServer. See CopyFontsMapServer for more details.
MapCache configuration
With the MapCache module of GeoCat Bridge you can configure a MapCache instance to serve map tiles. The MapCache module does not manage the seeding of map tiles.
MapCache requirements
With the MapCache module Bridge can configure one Mapcache instance per MapServer. This means that all the mapfiles with share one endpoint for the tile cache. To have Mapcache reload the configuration after each change to the configuration file it is required to have MapCache installed with FastCGI.
Installation instructions for MapCache with FastCGI on Ubuntu 14.04:
For MapCache to auto refresh the configuration MapCache with FastCGI is a prerequisite. To install Mapcache with FastCGI you need to install the following packages:
- mapcache-cgi (version 1.2.1-2)
- libapache2-mod-fcgid (version 1:2.3.9-1)
Install with:
sudo apt-get install mapcache-cgi libapache2-mod-fcgi
Enable the FastCGI apache module with:
Add the following snippet to the Apache virtual host (located on Ubuntu on /etc/apache2/sites-enabled/000-default.conf) to enable the MapCache service:
<IfModule mod_fcgid.c>
FcgidIOTimeout 120
FcgidInitialEnv "MAPCACHE_CONFIG_FILE" "/home/user/ftp/projects/mapcache.xml"
<Location /map.fcgi>
Order Allow,Deny
Allow from all
SetHandler fcgid-script
</Location>
ScriptAlias /map.fcgi "/usr/lib/cgi-bin/mapcache"
</IfModule>
Restart the Apache service:
Check whether MapCache is running correctly by visiting the following url in your browser (assuming that the Mapcache configuration file has the demo service enabled):
http://localhost/map.fcgi/demo
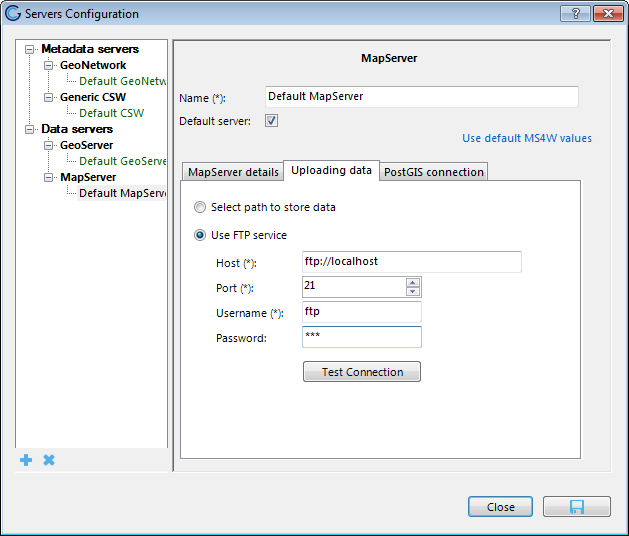
FTP setup
When republishing a Mapcache for a layer Bridge will delete the cached tiles from the temp folder path for that layer by FTP. This means that the temp folder needs to be accessible and writable by the FTP user. Therefore the Mapcache FTP configuration consists of two fields:
- Path to tmp folder –> Absolute path to tmp folder on server
- FTP path to tmp folder –> Path to tmp folder that is accessible for ftp user
In the scenario that FTP user is not allowed to venture outside of its home folder it is advised to mount the Mapcache temp folder in the FTP users home directory like this:
mkdir /home/user/ftp/mapcache-temp
mount --bind /tmp/mapcache/ /home/user/ftp/mapcache-temp
For the configuration of the Mapcache this means the following values:
- Path to tmp folder –>
/tmp/mapcache
- FTP path to tmp folder –>
/mapcache-temp
In the scenario that the FTP user has direct access to the Mapcache temp folder the same values can be supplied:
- Path to tmp folder –>
/tmp/mapcache
- FTP path to tmp folder –>
/tmp/mapcache
File permissions
MapCache needs sufficient permissions to write the tiles to the temporary folder. Therefore the temporary MapCache folder should be owned by the www-data user and www-data group.
sudo chown www-data:www-data /tmp/mapcache
The FTP user also needs permissions to delete tiles from the temporary folder. SO the FTP users needs to be added to the www-data group and the File Acces Control list for the MapCache folder needs to be modified, so all files created in the MapCache temp folder are writable by group members.
usermod -g www-data user
sudo chmod g+s /tmp/mapcache/
sudo setfacl -d -m g::rwx /tmp/mapcache/
sudo setfacl -d -m o::rx /tmp/mapcache/
The MapCache configuration file
The MapCache configuration file generated by Bridge will look like this:
<?xml version="1.0" encoding="utf-16"?>
<mapcache>
<cache name="disk" type="disk">
  <base>/tmp/mapcache</base>
  <symlink_blank />
</cache>
<service type="wmts" enabled="true" />
<service type="tms" enabled="true" />
<service type="kml" enabled="true" />
<service type="gmaps" enabled="true" />
<service type="ve" enabled="true" />
<service type="mapguide" enabled="true" />
<service type="demo" enabled="true" />
<service type="wms" enabled="true">
  <full_wms>assemble</full_wms>
  <resample_mode>bilinear</resample_mode>
  <maxsize>4096</maxsize>
</service>
<source name="mxdname:layername" type="wms">
  <getmap>
    <params>
      <format>image/png</format>
      <LAYERS>sites</LAYERS>
    </params>
  </getmap>
  <http>
    <url>http://host/cgi-bin/mapserv?map=pathtomapfile</url>
  </http>
</source>
<tileset name="mxdname:layername">
  <source>mxdname:layername</source>
  <cache>disk</cache>
  <grid>g</grid>
  <grid>WGS84</grid>
  <grid>GoogleMapsCompatible</grid>
  <format>PNG</format>
  <metatile>5 5</metatile>
  <metabuffer>10</metabuffer>
  <expires>3600</expires>
  <metadata>
    <title />
    <abstract />
  </metadata>
</tileset>
<errors>report</errors>
<lock_dir>/tmp/mapcache</lock_dir>
<auto_reload>true</auto_reload>
<default_format>JPEG</default_format>
</mapcache>
Any new layers published will be inserted in the MapCache configuration file. By default for each layer a tile cache is configured for the following projections:
- epsg:4326
- epsg:3857
- epsg:900913
To generate a tile cache for a different projection you will need to publish your layer to MapServer with that projection enabled and insert a tiling definition scheme in the MapCache configuration file. It should be inserted as a direct child of the Mapcache element. For instance a tiling scheme for RD_NEW (epsg:28992) is:
<grid name="rd">
        <metadata>
                <title>Rijksdriehoekstelsel</title>
        </metadata>
        <!--extent>12000,304000,280000,620000</extent-->
        <!--extent>98827,469579,142183,502096</extent--> <!-- Extent adam -->
        <extent>-285401.920,22598.080,595401.920,903401.920</extent>
        <srs>EPSG:28992</srs>
        <resolutions>3440.64 1720.32 860.16 430.08 215.04 107.52 53.76 26.88 13.44 6.72 3.36 1.68 0.84 0.42 0.21</resolutions>
        <units>m</units>
        <size>256 256</size>
</grid>
After inserting the tiling scheme in the MapCache configuration file, all future published layers will have a tile cache configured for that projection.
Mapcache configuration in Bridge
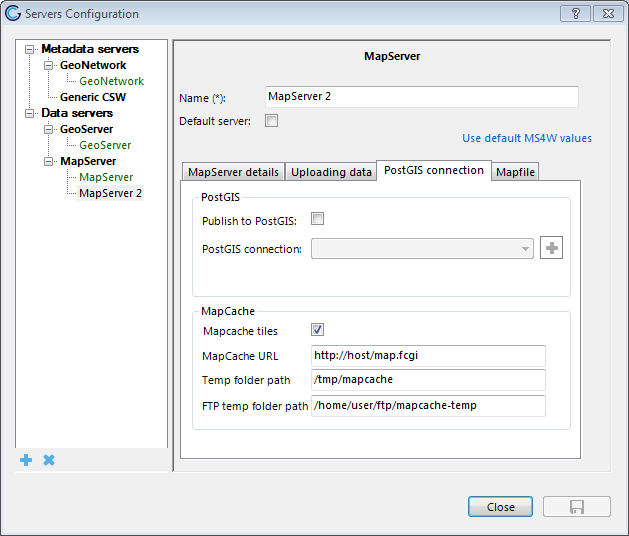
When the MapCache server is running at http://host/map.fcgi, the temp directory is /tmp/mapcache and this folder is accessible for the FTP user through /home/user/ftp/mapcache-temp, configure the MapCache connection in the PostGIS tab of the MapServer connection like this, but replace the correct values for user and host:
 Manual
2.5
Manual
2.5